發表文章

目前顯示的是 4月, 2008的文章

WPF學習日誌 ~ CaptureMouse ~

圖片
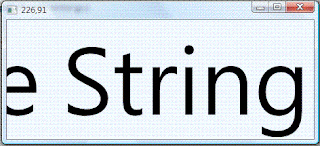
CaptureMouse顧名思義是捕捉滑鼠,那捕捉滑鼠要做什麼呢? 當我們捕捉住滑鼠的訊號之後,當滑鼠離開了Winddow的範圍之外,我們仍然可以收到MouseMove以及MouseUp的事件,這可以利用在縮/放部分,如果你有用過Blend(或是跑過DirectX的sample)的話,在調整(縮/放)工作區大小時,是類似的感覺;下面測試捕捉滑鼠,利用移動的距離來改變TextBlock的字體大小,執行結果像是下圖這樣 下面我們來看看測試的程式碼 Class Window1 Dim sp As StackPanel Dim tb As TextBlock Dim p As New Point Private Sub Window1_Loaded(ByVal sender As System.Object, ByVal e As System.Windows.RoutedEventArgs) Handles MyBase.Loaded sp = New StackPanel tb = New TextBlock tb.Text = "Some String here" tb.Background = Brushes.AliceBlue tb.HorizontalAlignment = Windows.HorizontalAlignment.Center tb.VerticalAlignment = Windows.VerticalAlignment.Center sp.Children.Add(tb) Me.Content = sp End Sub Protected Overrides Sub OnMouseMove(ByVal e As System.Windows.Input.MouseEventArgs) MyBase.OnMouseMove(e) If e.LeftButton = MouseButtonState.Pressed Then Me.Title = e.GetPosition(sp).X &

Windows Vista SP1

等候了許久,Windows Vista SP1出爐了,快去看看吧 :) Hotfixes and Security Updates included in Windows Vista Service Pack 1 Windows Vista Service Pack 1 All Language Standalone 版

Fix-Major Error 0x80004005, Minor Error 0. Attempted to divide by zero

這篇是給自己備忘了,有用SQL Compact的朋友也可以參考看看; 原文位置: FIX: Error message when you try to delete the rows from the table in SQL Server 2005 Compact Edition or in SQL Server Compact 3.5: "Major Error 0x80004005, Minor Error 0. Attempted to divide by zero" 底下是部分原文 Hotfix information A supported hotfix is now available from Microsoft. However, this hotfix is intended to correct only the problem that is described in this article. Apply this hotfix only to systems that are experiencing this specific problem. This hotfix might receive additional testing. Therefore, if you are not severely affected by this problem, we recommend that you wait for the next SQL Server 2005 Compact Edition service pack that contains this hotfix. To resolve this problem, submit a request to Microsoft Online Customer Services to obtain the hotfix. To submit an online request to obtain the hotfix, visit the following Microsoft Web site: http://go.microsoft.com/?linkid=6294451 (http://go.microsoft.com/?linkid=6294451)

WPF學習日誌 ~ ApplicationCommand ~

在WPF裡面有ApplicationCommand的功能可以讓我們來利用;比如說在做文字編輯的時候,會用到的剪下、貼上,等等的功能,在以往我們要撰寫一些對應的程式碼,除了功能的部分,在Enable/Disable相關的動作,我們也必須要去撰寫相關的程式碼,在WPF裡面我們可以很輕鬆的做到這些動作,你可以在執行過程中,觀看Enable/Disable的變化,對於相關的動作,我們可是沒有撰寫相關的程式碼喔,下面我們來看看測試的程式碼吧 Class Window1 Dim dp As DockPanel Dim tb As ToolBar Dim tbTray As ToolBarTray Dim txtBody As TextBox Dim btnCopy As Button Dim btnPaste As Button Dim btnCut As Button Private Sub Window1_Loaded(ByVal sender As System.Object, ByVal e As System.Windows.RoutedEventArgs) Handles MyBase.Loaded dp = New DockPanel Me.Content = dp tbTray = New ToolBarTray dp.Children.Add(tbTray) DockPanel.SetDock(tbTray, Dock.Top) txtBody = New TextBox txtBody.AcceptsReturn = True txtBody.Background = Brushes.AliceBlue txtBody.VerticalScrollBarVisibility = ScrollBarVisibility.Auto dp.Children.Add(txtBody) ''設定最後加入的項目填滿剩餘的空間 dp.LastChildFill = True '&#

WPF學習日誌 ~ ToolBar ~

圖片
這篇利用簡單的程式碼來熟悉一下ToolBar的使用方式,同樣的,也利用對照的方式,做了簡單的XAML Code來讓大家對照,下面就來看看程式碼吧 Class Window1 Dim dp As DockPanel Dim tb(3) As ToolBar Dim tbTray As ToolBarTray Dim txtBody As TextBox Private Sub Window1_Loaded(ByVal sender As System.Object, ByVal e As System.Windows.RoutedEventArgs) Handles MyBase.Loaded dp = New DockPanel Me.Content = dp tbTray = New ToolBarTray dp.Children.Add(tbTray) DockPanel.SetDock(tbTray, Dock.Top) txtBody = New TextBox txtBody.AcceptsReturn = True txtBody.Background = Brushes.AliceBlue txtBody.VerticalScrollBarVisibility = ScrollBarVisibility.Auto dp.Children.Add(txtBody) ''設定最後加入的項目填滿剩餘的空間 dp.LastChildFill = True For i As Integer = 0 To tb.Length - 1 tb(i) = New ToolBar ''設定ToolBar的文字,通常不使用 tb(i).Header = "TB" & i.ToString For j As Integer = 0 To 3 Dim

利用Combobox來選擇字型

圖片
Note:.net framework 2.0 , Windows Form 一般在使用Word之類的文書編輯軟體時在選擇字體的時候,可以在Combobox裡面看到字體的樣式,那在程式裡面怎麼做呢?下面我們來看看完成圖以及程式碼 不過這程式還有些問題,有些字型沒有辦法描繪,還沒有去找問題,先用try..catch去避開,參考看看嚕 Private Sub Form1_Load(ByVal sender As System.Object, ByVal e As System.EventArgs) Handles MyBase.Load ComboBox1.DrawMode = DrawMode.OwnerDrawVariable Dim oneFontFamily As FontFamily For Each oneFontFamily In FontFamily.Families ComboBox1.Items.Add(oneFontFamily.Name) Next End Sub Private Sub ComboBox1_DrawItem(ByVal sender As Object, ByVal e As System.Windows.Forms.DrawItemEventArgs) Handles ComboBox1.DrawItem Dim g As Graphics = e.Graphics Try g.DrawString(ComboBox1.Items.Item(e.Index), _ New Font(ComboBox1.Items.Item(e.Index).ToString, 10), _ Brushes.Black, e.Bounds.X, e.Bounds.Y) Catch ex As Exception End Try End Sub 相關參考 HOW TO:在 ComboBox 控制項中建立各種大小的文字 FontFamily 類別

WPF學習日誌 ~ ContextMenu ~

圖片
在 上一篇 有簡單說明一下Run的用法,這篇利用Run的範例,稍微加一點東西配合快顯功能表的介面來設定字體的樣式,執行畫面如下圖 下面是測試的程式碼 Class Window1 Dim sp As StackPanel Dim txtBlock As TextBlock Dim tmpR As Run Dim cMenu As ContextMenu Dim itemB As New MenuItem Dim itemI As New MenuItem Private Sub Window1_Loaded(ByVal sender As System.Object, ByVal e As System.Windows.RoutedEventArgs) Handles MyBase.Loaded ''快顯功能表初始化 cMenu = New ContextMenu itemB = New MenuItem itemB.Header = "Bold" cMenu.Items.Add(itemB) itemI = New MenuItem itemI.Header = "Italic" cMenu.Items.Add(itemI) ''功能表事件掛載 cMenu.AddHandler(MenuItem.ClickEvent, New RoutedEventHandler(AddressOf MenuItem_Click)) sp = New StackPanel Me.Content = sp txtBlock = New TextBlock txtBlock.Height = 300 txtBlock.Width = 300 txtBlock.HorizontalAlignment = Windows.HorizontalAlignment.Center txtBlock.Ba

Run ? 這是什麼東東

圖片
在看書的過程中,好幾次看到"run"這個東西,還滿有趣的,可以將文字切割開來,而且各自擁有其對應的"事件",簡單測試一下當滑鼠移動到字的上方改變字的顏色以及大小,執行結果像是這樣 下面就來看看測試的程式碼吧 Class Window1 Dim sp As StackPanel Dim txtBlock As TextBlock Private Sub Window1_Loaded(ByVal sender As System.Object, ByVal e As System.Windows.RoutedEventArgs) Handles MyBase.Loaded sp = New StackPanel Me.Content = sp txtBlock = New TextBlock txtBlock.Height = 300 txtBlock.Width = 300 txtBlock.HorizontalAlignment = Windows.HorizontalAlignment.Center txtBlock.Background = Brushes.AliceBlue txtBlock.FontSize = 32 sp.Children.Add(txtBlock) Dim strArr() As String = {"T", "H", "I", "S", " ", "A", " ", "B", "O", "O", "K"} For Each s As String In strArr Dim runTmp As New Run(s) runTmp.TextDecorations = New TextDecorationCollection

GetType().InvokeMember

在 程式執行階段,要如何判斷表單中是否存在 tooltip 這篇文章中,提問者問到要如何判斷Form裡面是不是有ToolTip,而ToolTip不包含在Controls集合中,測試了一下,不太確定這樣的做法是不是繞了遠路,大家研究看看吧 Imports System.ComponentModel Public Class Form1 Private Function HasToolTip() As Boolean If Me.components.Components Is Nothing Then Return False Else For Each c As Component In Me.components.Components If TypeName(c) = "ToolTip" Then Return True End If Next Return False End If End Function Private Sub Button1_Click(ByVal sender As System.Object, ByVal e As System.EventArgs) Handles Button1.Click MessageBox.Show(Me.HasToolTip()) Test.CheckToolTip(Me) End Sub End Class Public Class Test Public Shared Sub CheckToolTip(ByRef frm As Object) Dim o As Object = _ frm.GetType().InvokeMember("HasToolTip", _ Reflection.BindingFlags.Instance

用"有意義"的名稱來代表常數

圖片
Note:.net framework 2.0 今天在 請問自訂引數名稱該怎麼做? 這篇文章中看到這個問題,在程式寫作過程中也會常遇到這個需求,所以給他小小的整理一下,比如說像下面這張圖 這樣會自動帶出常數名稱相當方便而且直覺,很簡單的就能知道對應代表的意義,那建立我們自己專屬的變數怎麼做呢?請參考下面這張圖

WPF學習日誌 ~ Menu ~

下面這篇我們用簡單的程式碼來測試一下Menu的功能,先來看看測試的程式碼 Imports System.Windows Imports System.IO Imports System.Reflection Class Window1 Dim dp As DockPanel Dim MotherMenu As Menu Dim LV1_Menu(4) As MenuItem Dim LV2_Menu(4) As MenuItem Dim txtBody As TextBox Private Sub Window1_Loaded(ByVal sender As Object, ByVal e As System.Windows.RoutedEventArgs) Handles Me.Loaded ''初始化Content的容器 dp = New DockPanel Me.Content = dp ''實體化Menu MotherMenu = New Menu For i As Integer = 0 To 4 ''加入第一層目錄 LV1_Menu(i) = New MenuItem ''設定Menu文字 LV1_Menu(i).Header = "Menu._" & i MotherMenu.Items.Add(LV1_Menu(i)) For j As Integer = 0 To 4 ''加入第二層目錄 LV2_Menu(j) = New MenuItem LV2_Menu(j).Header = "Menu." & i & "-" & j LV1_Menu(i).Items.Add(L

GPS

這篇是之前做在Yahoo上面的一篇文章,把它移過來,免的忘記了,有需要的朋友可以參考看看 一般常用的衛星導航都會用到GPS,這裡說明一下GPS的通訊與資料的格式GPS也是利用Serial port的方式來傳遞資料,速率上一般是使用 4800,N,8,1傳輸上是單向的,也就是說我能夠收到衛星傳過來的訊息,但不能發送訊息給衛星..下面簡單說明一下協定的部份,如果須要更詳細的資料可以到以下網址參考 http://www.gpsinformation.org/dale/nmea.htm#intro - GPS NMEA Protocol -NMEA 是GPS用的標準通訊協定,傳回值是一串ASCII的字串,舉例來說可能會收到如下一串字$GPRMC,053322.682,A,2502.6538,N,12121.4838,E,0.00,315.00,080905,,,A*6F 053322.682:UTC Time , 格式是hhmmss.sss所以是5:33:22.682 A:代表資料是有效的,如果找不到衛星的話會是V 2502.6538:代表的是緯度,格式是degree * 100 + minutes。但是minutes是100進位,所以 要/100 * 60轉為degree,轉換後就是25'02'39.228''. 2502.6538 / 100 = 25.02 0.6538 * 60 = 39.228 N:代表緯度的資料是北緯 12121.4838:代表是經度,格式同緯度的部份一樣要經過轉換。 E:代表經度的資料是東經 0.00:代表的是速度,這裡因為天線沒有移動,所以是0 315.00:代表的是方向 080905:代表的是現在的日期,格式是ddmmyy再過來有兩個欄位沒有用到所以空著 A:不確定 *6F:代表的是CheckSum CheckSum(檢查碼)是以*號開頭,後面兩個Ascii字元算法如下 不包含開頭的'$',一直計算到'*'之前。一個byte一個byte的作XOR.

WPF學習日誌 ~ 選擇顏色的 ListBox ~

圖片
在以往Windows Form的應用程式中,ListBox裡面能夠放什麼呢?第一個直覺就是"字",如果要每個Item都各自擁有各自的顏色,那還要自行去處理繪製的動作,而處理繪製的動作時可能又會讓選取項目的時候失去選取項目時的"醒目提示"(背景變成藍色,表示被選取的狀態),到了WPF這樣的情形獲得很大的改善 下面這個範例所做出來的是一個選擇顏色用的ListBox,像是下面這張圖 從這個範例我們也可以看出WPF的"控制項"可塑性相當的高,下面我們就來看看程式碼吧 Imports System.Windows Imports System.IO Imports System.Reflection Class Window1 Dim sp As StackPanel Dim lstColor As ListBox Private Sub Window1_Loaded(ByVal sender As Object, ByVal e As System.Windows.RoutedEventArgs) Handles Me.Loaded ''初始化用來放置Listbox的容器 sp = New StackPanel Me.Content = sp lstColor = New ListBox lstColor.Margin = New Thickness(5) lstColor.MaxHeight = 300 lstColor.MaxWidth = 300 ''Form調整大小的模式設定為內含物件的高度 Me.SizeToContent = Windows.SizeToContent.Height ''使用Reflection取得顏色相關的資料 Dim propInfo() As PropertyInfo propInfo = GetType(Colors).GetProperties For Each prop As PropertyInfo

SearchIndexer 耗損CPU資源

我的電腦是用Vista的作業系統,最近在一開機的時候CPU的使用率常態的被吃掉4x多,整個系統變的很慢,打開工作管理員一看,都是SearchIndexer.exe這隻程式..搜尋了一下,參考 SearchIndexer.exe at 99% util for over 48 hours now, system unresponsive 這篇文章,將機碼修改 HKEY_LOCAL_MACHINE\SOFTWARE\Microsoft\Windows Search\SetupCompletedSuccessfully = 0 呼,目前看起來是OK了,繼續觀察看看..有一樣症狀的朋友可以參考看看。

Directx 相關資源

這篇是給自己備忘了,最近在找一些解決方案,有可能會用到DirectShow,找了一下相關資料,先列出來以免忘了;DircetX還是以C/C++的方式開發的屬多數,另外之前有Maneged DirectX 1.0,後來就變成XNA了,這部分之前都沒碰過,想用Managed Code來作,看來還有一些路要走啊.. http://sourceforge.net/projects/directshownet/ DirectShow http://www.shrinkwrapvb.com/ Experimental code using DirectShow with the .NET Framework 1.0

如何在Systray(系統工具列)裡面增加應用程式的圖案

這也是一個相當常見的問題,在右下角我們會看到一些常駐程式的圖形顯示在上面,那我們也辦的到嗎?可以的,而且在.net framework 2.0是很容易的 Question: 原文位置: 工作列 (Task bar)> 我開啟一個表單,然後當我按下縮小的時候 他會以我設定好的圖示出現在工作列 (Task bar)中 當我雙按滑鼠 左鍵點兩下可再度開啟 右鍵會出現一個選單可以讓我選擇關閉 這樣的功能ShowInTaskbar,NotifyIcon 我該如何做呢? 下面是參考的程式碼 Private Sub Form1_Resize(ByVal sender As Object, ByVal e As System.EventArgs) Handles Me.Resize Application.DoEvents() If Me.WindowState = FormWindowState.Minimized Then Me.Hide() NotifyIcon1.Visible = True NotifyIcon1.ShowBalloonTip(1000) NotifyIcon1.Text = "12345" End If End Sub 相關參考 NotifyIcon 範例 NotifyIcon 元件 (Windows Form)

Graphics.SetClip 方法

Note:.net framework v2.0 今天看討論區的這篇文章 請問如何把DrawImageUnscaled畫出來的東西放到剪貼簿呢? ,看到提問者用了SetClip的方法,之前沒用過,於是乎到MSDN查詢了一下,將用法整理如下,大家可以參考看看,程式碼部分是直接用MSDN上面的範例 SetClip的作用是限定繪圖的區域,可以參考一下下面網頁 http://msdn2.microsoft.com/zh-tw/library/ms142116(VS.80).aspx 依照範例程式碼建立新的Windows Form應用程式之後,貼上下面程式碼來測試 Public Class Form1 Public Sub SetClipGraphicsCombine(ByVal e As PaintEventArgs) ' Create temporary graphics object and set its clipping region. Dim newGraphics As Graphics = Me.CreateGraphics() newGraphics.SetClip(New Rectangle(0, 0, 100, 100)) ' Update clipping region of graphics to clipping region of new graphics. e.Graphics.SetClip(newGraphics, Drawing2D.CombineMode.Replace) ' Fill rectangle to demonstrate clip region. e.Graphics.FillRectangle(New SolidBrush(Color.Black), 0, 0, 500, 300) ' Release new graphics. newGraphics.Dispose() End Sub Private Sub Form1_Paint(ByVal sender As Object, ByVal e As System.Win

Managed Direct3D Mobile Samples

今天在找一些資料的時候看到了一些sample以及參考資料,把相關的連結貼出來,免的忘了,有興趣的朋友可以一起參考看看 Managed Direct3D Mobile Samples 原文內提到的相關連結列在下面 Direct3D Mobile Billboard Sample Shows how to perform billboarding to draw trees. Direct3D Mobile Fixed Point Billboard Sample Shows how to perform billboarding to draw trees using fixed point math. Direct3D Mobile Create Device Sample Provides a tutorial for creating a Direct3D device and using it to clear the window. Direct3D Mobile Fractal Sample Shows how to use fractals to generate and display height map. Direct3D Mobile Fixed Point Fractal Sample Shows the fractal sample converted to use fixed point math. Direct3D Mobile Lighting Sample Provides a tutorial on how to use lighting. Direct3D Mobile Fixed Point Lighting Sample Shows how to, using fixed point math, make moving directional and point lights. Direct3D Mobile Lights Sample Shows how to make moving directional and point lights. Direct3D Mobile Matrices Sample This sample provides a tutorial on how to use matrix transfo

文章推薦 [黑暗執行緒 Windows Form UI優化入門課–非同步作業]

今天在看 黑暗執行緒 ,看到了這邊文章 Windows Form UI優化入門課 – 非同步作業 ,其中文章下載的部分可以下載一個PDF檔來看,看過之後真的很不錯,對於BackgroundWorker或是非同步作業還不是很熟悉的朋友一定要去看看~強力推薦~