發表文章

目前顯示的是有「WPF」標籤的文章

如何讓Restful Service回應圖片

在一般利用WCF還做restful的服務,回應的部分可以指定要輸出為XML格式或是JSON格式,那麼如果說想要直接回應一張圖片的時候應該要怎麼進行呢? 手上是用WPF的應用程式,先Self Host一個restful service上去,之後來處理回應圖片的部分,下面是參考資訊來源 Self host http://stackoverflow.com/questions/20805317/how-to-set-up-wcf-self-hosted-rest-service Response image http://www.c-sharpcorner.com/uploadfile/dhananjaycoder/fetching-image-using-wcf-rest-service/ http://stackoverflow.com/questions/12781173/cant-return-image-from-wcf-rest-service 主要的方式便是將圖片轉換成Stream,之後http這邊設定回應的類型是image,這樣就可以達成想要的樣子了,下面來看看程式碼的部分吧 Interface     [ ServiceContract ] interface   IMyService {     [ OperationContract ]     [ WebInvoke (UriTemplate  =   "/GetImage" , Method  =   "GET" ,         RequestFormat  =   WebMessageFormat . Xml, ResponseFormat  =   WebMessageFormat . Xml,         BodyStyle  =   WebMessage...

[WPF] 如何取得觸發快顯功能表(右鍵選單)的來源控制項呢?

在WPF中,右鍵選單的功能是利用ContextMenu來達成,如果是用程式碼的方式來幫控制項添加右鍵選單,會大概是下面的方式                  Image   image   =   new   Image ();                  MenuItem   propertyMenu   =   new   MenuItem ();                  propertyMenu . Header   =   "Propertys..." ;                  propertyMenu . Click   +=   ImagePropertyMenu_Click ;                  image . ContextMenu   =   new   ContextMenu ();                  image . ContextMenu . Items . Add ( propertyMen...

筆記-NavigationWindow

圖片
甚麼是巡覽式的應用程式呢?巡覽式的應用程式跟網頁的操作,或是跟安裝軟體的畫面過程有點像,先來看看執行起來是甚麼樣子 在上面的地方,可以看到一個像是瀏覽器『上一頁』、『下一頁』的按鈕,而主要的操作方式便是在同一個畫面中,去瀏覽各個不同的『頁面』;接下來就來看看要怎麼做出這樣子的應用程式。 首先建立一個WPF應用程式之後,在預設的狀態下,會建立一個MainWindow.xaml,裡面會有一個Window,xaml的部分會長的像是這樣 < Window x : Class = " WpfApplication1.MainWindow "         xmlns = " http://schemas.microsoft.com/winfx/2006/xaml/presentation "         xmlns: x = " http://schemas.microsoft.com/winfx/2006/xaml "         Title = " MainWindow " Height = " 350 " Width = " 525 " >     < Grid >             </ Grid > </ Window > 那麼首先要先將這個改成NavifationWindow,做為主要的顯示容器,修改之後像是下圖 而在後置程式碼的地方也要修改一下 namespace NavigateTest { /// <summary> /// Interaction logic for MainWindow.xaml /// </summary> public partial class MainWindow : NavigationWindow { pu...

簡單的PDF檔案瀏覽程式

圖片
最近在熟悉WPF相關的環境以及操作方式,而日常作業中又常常會遇到需要使用PDF檔案的情況,PDF檔案一多時(尤其是都從email進來)說實在還真不是很好整理;所以想說是不是能夠做個小程式來瀏覽這些PDF檔案呢?於是就搞了這麼一個初版的小程式。 首先是參考的資料來源, Displaying a PDF file within a WPF application ,裡面的說明相當的詳細,可以直接前往參考,下面所做的程式也是參考這篇而做的。這個做法是利用Adobe的ActiveX元件來做瀏覽的功能,所以在使用之前,目標電腦上 至少必須要安裝Adobe Reader才能夠順利執行 喔,這要特別注意一下。 接下來根據上面連結所提到的,在建立UserControler的時候在工具箱當中,要加入Adobe的原件,以方便我們將控制項拖拉到畫面上,這個部分可以在COM頁籤當中找到,像是下圖 簡單的做好UserControler之後,就要在主要的畫面(XAML檔案)加入這個UserControl了,而由於這是一個COM元件,所以必須要將他放在一個WindowsFormHost控制項當中,這可以在工具箱中找到 接下來在就是主畫面的部分,在功能的部分,我是想做到指定一個基本的資料夾,之後將該資料夾中所有的目錄列在第一層(利用Expender+StackPanel),目錄下面就列出所有PDF檔案,於是做了下面簡單的畫面 在Blend裡面UI的畫面看起來大概像下面這樣 好,接下來就來看看主要畫面的程式碼了 using System; using System.Collections.Generic; using System.Linq; using System.Text; using System.Windows; using System.Windows.Controls; using System.Windows.Data; using System.Windows.Documents; using System.Windows.Input; using System.Windows.Media; using System.Windows.Media.Imaging; using System.Windows.Navigation; using System.Windo...

Application.Doevents in WPF

在以往Windows Form的應用程式中,在長時間的迴圈中需要更新UI的時候,通常會下一個Application.Doevents的指令,用意是讓程式去處理訊息迴圈中相關的訊息,而在WPF中卻已經看不到這個東東了,跑哪裡去了呢?我們可以參考下面這篇 Application.DoEvents in .NET 3.0 ? 其中有一篇MSDN的相關連結,我把相關的程式碼節錄在下面 Public Sub DoEvents() Dim frame As New DispatcherFrame() Dispatcher.CurrentDispatcher.BeginInvoke(DispatcherPriority.Background, New DispatcherOperationCallback(AddressOf ExitFrame), frame) Dispatcher.PushFrame(frame) End Sub Public Function ExitFrame(ByVal f As Object) As Object CType(f, DispatcherFrame).Continue = False Return Nothing End Function 或是有另一種方式,利用匯入System.Windows.Forms的命名空間來使用也是可以的。 最後;在這邊也是要提一下,水能載舟,亦能覆舟,在Doevents的使用上要小心,可以利用但是不要濫用,Doevents將控制權放出去之後,甚麼時候會再回到原先被插斷的程式碼位置,這是無法控制的;而如果程式中有過多的Doevents,程式的執行過程會相當難以預測,造成不可預期的結果的。

WPF - 利用資料繫結顯示DataSet的資料

殘念啊...由於XAML Code的關係,請各位到 點部落看相關文章 吧~感恩

WPF - Resource

這篇大部分是XAML Code,所以這邊就只留轉向了,請有興趣的朋友到 點部落看相關文章 吧,感恩。

WPF - SkewTransform

這篇測試一下SkewTransform的功能,做了一個"丟猴"的按鈕,有興趣的朋友可以跑程式測試看看 測試的程式碼是下面這些,另外由於這邊貼XAML真的是很頭大,到 點部落看完整的文章 吧 Class Window1 Dim st As New SkewTransform Dim myT As Threading.DispatcherTimer Dim R As New Random Dim tmpTop As Double = 0 Private Sub btn1_Click(ByVal sender As System.Object, ByVal e As System.Windows.RoutedEventArgs) Handles btn1.Click ''Timer相關設定 myT = New Threading.DispatcherTimer myT.Interval = New TimeSpan(0, 0, 0, 0, 100) AddHandler myT.Tick, AddressOf Timer_Tick myT.Start() End Sub Private Sub Timer_Tick(ByVal sender As Object, ByVal e As EventArgs) If Canvas.GetTop(btn1) >= cv.ActualHeight Then myT.Stop() End If Randomize() st.AngleX = (0.5 - R.NextDouble) * 30 st.AngleY = (0.5 - R.NextDouble) * 50 System.Threading.Thread.Sleep(30) btn1.RenderTransform = st Canvas.SetLeft(btn1, R.NextDouble * 50) tmpTop = tmp...

WPF - RotateTransform

圖片
這篇來測試一下旋轉的效果,旋轉的效果是將RotateTransForm設定給控制項的RenderTransForm屬性,執行的結果像下面這樣 下面我們就來看看測試的程式碼吧 Imports System.Windows Imports System.IO Imports System.Reflection Class Window1 Dim cv As Canvas Dim myT As Threading.DispatcherTimer Dim btnOther As New Button Dim rotatePoint As Double = 0 Private Sub Window1_Loaded(ByVal sender As System.Object, ByVal e As System.Windows.RoutedEventArgs) Handles MyBase.Loaded cv = New Canvas Me.Content = cv For z As Integer = 0 To 9 Dim btn As New Button btn.Name = "btn_" & z ''設定旋轉的原點 btn.RenderTransformOrigin = New Point(0, 0) ''設定旋轉的角度 btn.RenderTransform = New RotateTransform(z * 36) btn.Content = "Button" & z & " Rotate=" & Format(z * 36, "000") btn.Background = Brushes.LightPink Canvas.SetLeft(btn, 150) Canvas.SetTop(btn, 150...

WPF - 簡單的圖檔瀏覽程式

圖片
這篇當作練習題,把之前的稍為回憶一下,來作個簡單的圖檔瀏覽程式,完成之後是像下面這樣 介面的部分就改用XAML Code來作了,下面我們來看看相關的程式碼吧 Imports System.Windows Imports System.IO Imports System.Reflection Class Window1 Dim smallImg() As Image Private Sub Window1_Loaded(ByVal sender As System.Object, ByVal e As System.Windows.RoutedEventArgs) Handles MyBase.Loaded RefreshImage() End Sub Private Sub wpSmallImg_MouseDown(ByVal sender As Object, ByVal e As System.Windows.Input.MouseButtonEventArgs) Handles spSmallImg.MouseDown If e.OriginalSource.GetType.Name = "Image" Then LargerImg.Source = CType(e.OriginalSource, Image).Source End If End Sub Private Sub btnSelect_Click(ByVal sender As Object, ByVal e As System.Windows.RoutedEventArgs) Handles btnSelect.Click Dim dlgOpen As New Windows.Forms.FolderBrowserDialog If dlgOpen.ShowDialog = Forms.DialogResult.OK Then txtSource.Text = dlgOpen.SelectedPath RefreshImage() End If End S...

WPF 教學短片

各位鄉親阿,由曹祖聖老師錄製的一系列有關WPF的教學短片已經放上MSDN了,千萬不要錯過啦,快點去瞧瞧吧 MSDN WPF 教學短片

WPF - Expander

圖片
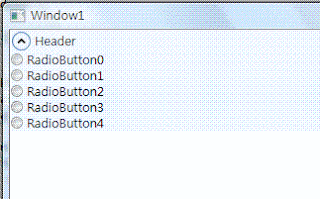
Expander也算是一種容器,下面我們簡單的用程式碼來測試一下Expander的功能,執行結果畫面大概是像下面這樣 Imports System.Windows Imports System.IO Imports System.Reflection Class Window1 Dim sp As StackPanel Dim exp As Expander Dim chsp As StackPanel Private Sub Window1_Loaded(ByVal sender As System.Object, ByVal e As System.Windows.RoutedEventArgs) Handles MyBase.Loaded sp = New StackPanel Me.Content = sp chsp = New StackPanel For z As Integer = 0 To 4 Dim rdo As New RadioButton rdo.Name = "rdo" & z rdo.Content = "RadioButton" & z chsp.Children.Add(rdo) Next exp = New Expander exp.Content = chsp exp.Background = Brushes.AliceBlue sp.Children.Add(exp) ''設定展開的方向 ''exp.ExpandDirection = ExpandDirection.Right exp.Header = "Header" End Sub End Class

WPF學習日誌 ~ RadioButton ~

RadioButton與之前在Windows Form的時候使用上沒有太大的差異,下面這邊我們特別說明一個GroupName這個屬性;在以往,同一個群組的項目我們會把它放到容器中,用容器來作分割;而在WPF裡面則是用GroupName來作分割,下面我們來看看測試的程式碼 Imports System.Windows Imports System.IO Imports System.Reflection Class Window1 Dim spMain As StackPanel Dim wpChild_1 As WrapPanel Dim wpChild_2 As WrapPanel Dim rdoA(2) As RadioButton Dim rdoB(2) As RadioButton Dim tbMsg As TextBlock Private Sub Window1_Loaded(ByVal sender As Object, ByVal e As System.Windows.RoutedEventArgs) Handles Me.Loaded spMain = New StackPanel Me.Content = spMain For z As Integer = 0 To 2 rdoA(z) = New RadioButton rdoA(z).Content = "RadioButton-A-" & z ''不指定GroupName的話預設是"" 'rdoA(z).GroupName = "A" rdoA(z).Margin = New Thickness(3) AddHandler rdoA(z).Checked, AddressOf RadioButton_Checked rdoB(z) = New RadioButton rdoB(z).Content = ...

WPF學習日誌 ~ RepeatButton ~

RepeatButton也是Buton其中的一種,主要的差別是在於當你按住RepeatButton不放的時候,Click事件會被重複的觸發;下面是測試的程式碼,可以測試壓著Button不放的時候TextBox的變化 Imports System.Windows Imports System.IO Imports System.Reflection Class Window1 Dim wp As WrapPanel Dim txtInput As TextBox Dim btnAdd As Windows.Controls.Primitives.RepeatButton Private Sub Window1_Loaded(ByVal sender As Object, ByVal e As System.Windows.RoutedEventArgs) Handles Me.Loaded wp = New WrapPanel Me.Content = wp txtInput = New TextBox txtInput.Width = 200 txtInput.Text = "0" wp.Children.Add(txtInput) btnAdd = New Windows.Controls.Primitives.RepeatButton btnAdd.Content = "Press Me" wp.Children.Add(btnAdd) AddHandler btnAdd.Click, AddressOf Button_OnClick End Sub Protected Sub Button_OnClick(ByVal sender As Object, ByVal e As RoutedEventArgs) txtInput.Text = CInt(txtInput.Text) + 1 End Sub End Class

WPF學習日誌 ~ 只能輸入數字的TextBox ~

在Windows Form常常有一些驗證輸入的需求,限制只能輸入某些字的TextBox在WPF中跟之前沒有太大的不同,下面簡單的列出處理部分的程式碼 AddHandler txt.PreviewKeyDown, AddressOf TextBox_PreviewKeyDown 這裡我們在PreviewKeyDowm的事件中處理,處理的程式碼像下面這樣 Protected Sub TextBox_PreviewKeyDown(ByVal sender As Object, ByVal e As KeyEventArgs) If (e.Key Key.D9) Then e.Handled = True End If End Sub 要特別注意的是在PreviewKeyDown事件中不要直接抓TextBox.Text來作處理喔,因為這個事件中抓到的Text是"還沒有把輸入文字附加到Text屬性上"的

WPF學習日誌 ~ 事件傳遞 ~

這篇簡單的說明一下在WPF中事件傳遞的部分,下面是測試的程式碼 Class Window1 Dim sp As StackPanel Private Sub Window1_Loaded(ByVal sender As Object, ByVal e As System.Windows.RoutedEventArgs) Handles Me.Loaded sp = New StackPanel Me.Content = sp Dim tb As New TextBlock tb.Text = "I am a TextBlock" sp.Children.Add(tb) Dim btn As New Button btn.Content = "Button" sp.Children.Add(btn) Dim txt As New TextBox txt.Text = "Test words" sp.Children.Add(txt) AddHandler Me.MouseDown, AddressOf El_OnMouseDown End Sub Protected Sub El_OnMouseDown(ByVal sender As Object, ByVal e As MouseButtonEventArgs) If e.ChangedButton = MouseButton.Right Then Me.Title = "Source:" & e.Source.ToString & " OriginalSource:" & e.OriginalSource.ToString If CType(e.Source, FrameworkElement).Margin = New Thickness(5) Then CType(e.So...

WPF Sample

在 MSDN 上有提供相當多的WPF相關範例可以參考,對這部分有興趣的朋友可千萬別錯過了;原文位置如下 Windows Presentation Foundation 範例 節錄部分相關主題連結如下 WPF 入門範例 應用程式開發範例 WPF 基本概念範例 協助工具範例 控制項範例 資料範例 (WPF) 文件範例 (WPF) 圖形和多媒體範例 全球化和當地語系化範例 移轉和互通性範例

WPF學習日誌 ~ Canvas ~

之前我們有介紹WPF裡面的容器,這個是最後一個容器了,Canvas,它的主要特性其實就是利用絕對位置來排列控制項,下面我們用簡單的測試程式碼來看一下 Class Window1 Dim cv As Canvas Private Sub Window1_Loaded(ByVal sender As System.Object, ByVal e As System.Windows.RoutedEventArgs) Handles MyBase.Loaded cv = New Canvas cv.Width = 300 cv.Height = 300 cv.Background = Brushes.AliceBlue For i As Integer = 0 To 4 Dim B As New Button B.Content = "_" & i.ToString Canvas.SetLeft(B, i * 20) Canvas.SetTop(B, i * 20) cv.Children.Add(B) Next Me.Content = cv End Sub End Class

WPF學習日誌 ~ CaptureMouse ~

圖片
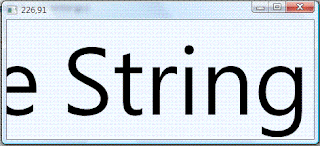
CaptureMouse顧名思義是捕捉滑鼠,那捕捉滑鼠要做什麼呢? 當我們捕捉住滑鼠的訊號之後,當滑鼠離開了Winddow的範圍之外,我們仍然可以收到MouseMove以及MouseUp的事件,這可以利用在縮/放部分,如果你有用過Blend(或是跑過DirectX的sample)的話,在調整(縮/放)工作區大小時,是類似的感覺;下面測試捕捉滑鼠,利用移動的距離來改變TextBlock的字體大小,執行結果像是下圖這樣 下面我們來看看測試的程式碼 Class Window1 Dim sp As StackPanel Dim tb As TextBlock Dim p As New Point Private Sub Window1_Loaded(ByVal sender As System.Object, ByVal e As System.Windows.RoutedEventArgs) Handles MyBase.Loaded sp = New StackPanel tb = New TextBlock tb.Text = "Some String here" tb.Background = Brushes.AliceBlue tb.HorizontalAlignment = Windows.HorizontalAlignment.Center tb.VerticalAlignment = Windows.VerticalAlignment.Center sp.Children.Add(tb) Me.Content = sp End Sub Protected Overrides Sub OnMouseMove(ByVal e As System.Windows.Input.MouseEventArgs) MyBase.OnMouseMove(e) If e.LeftButton = MouseButtonState.Pressed Then Me.Title = e.GetPosition(sp).X & ...

WPF學習日誌 ~ ApplicationCommand ~

在WPF裡面有ApplicationCommand的功能可以讓我們來利用;比如說在做文字編輯的時候,會用到的剪下、貼上,等等的功能,在以往我們要撰寫一些對應的程式碼,除了功能的部分,在Enable/Disable相關的動作,我們也必須要去撰寫相關的程式碼,在WPF裡面我們可以很輕鬆的做到這些動作,你可以在執行過程中,觀看Enable/Disable的變化,對於相關的動作,我們可是沒有撰寫相關的程式碼喔,下面我們來看看測試的程式碼吧 Class Window1 Dim dp As DockPanel Dim tb As ToolBar Dim tbTray As ToolBarTray Dim txtBody As TextBox Dim btnCopy As Button Dim btnPaste As Button Dim btnCut As Button Private Sub Window1_Loaded(ByVal sender As System.Object, ByVal e As System.Windows.RoutedEventArgs) Handles MyBase.Loaded dp = New DockPanel Me.Content = dp tbTray = New ToolBarTray dp.Children.Add(tbTray) DockPanel.SetDock(tbTray, Dock.Top) txtBody = New TextBox txtBody.AcceptsReturn = True txtBody.Background = Brushes.AliceBlue txtBody.VerticalScrollBarVisibility = ScrollBarVisibility.Auto dp.Children.Add(txtBody) ''設定最後加入的項目填滿剩餘的空間 dp.LastChildFill = True '...